Integrating Melonly with your ER:LC Server
Melonly seamlessly integrates with your ER:LC private server, delivering a powerful suite of features designed to enhance your server management experience. With Virtual Server Management, Member Checks, and real-time in-game log reporting, Melonly keeps your moderation team informed and in control through the moderator panel or directly in your Discord channel.ER:LC Virtual Server Management.
The Virtual Server Management (VSM) allows users to execute In-game commands directly from the moderator panel or by the Discord command “/erlc command”. This feature is automatically enabled once you set up your API Key.Getting API Key
Getting API Key
To locate your ER:LC API key, join your private server and head over to your
Private Server Settings, find your ER:LC API, and retrieve your unique key.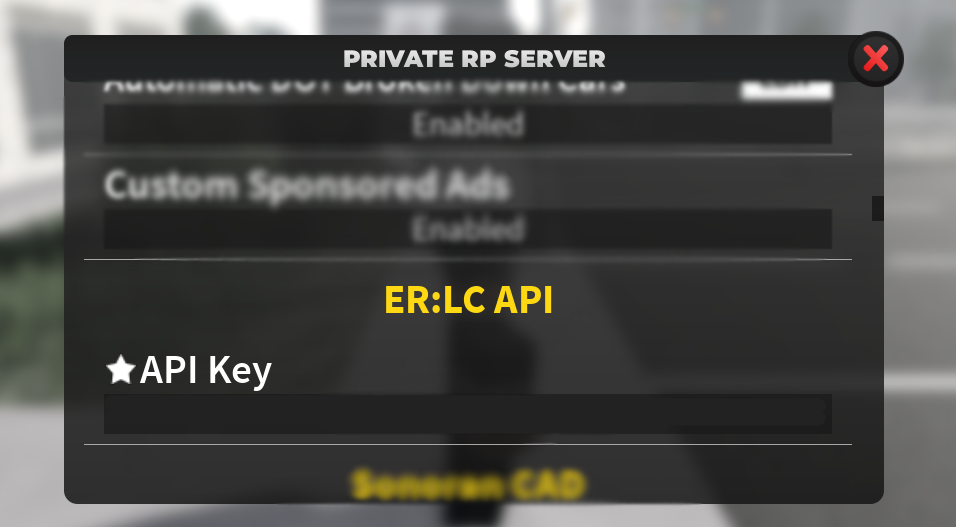
Example of where to find your API key
Setting up the API
Setting up the API
First, navigate to your Melonly Server’s dashboard, head over to ER:LC Integration and press
Manage Linked Servers, enter your API Key, input a label and click Add Server. Your server information should display just to the right of the set up button if done correctly.The Mutiple API Feature allows you to switch between different API Keys, all settings remain on each API Key separately unlocking the ability to have multiple ER-LC Integration Configurations.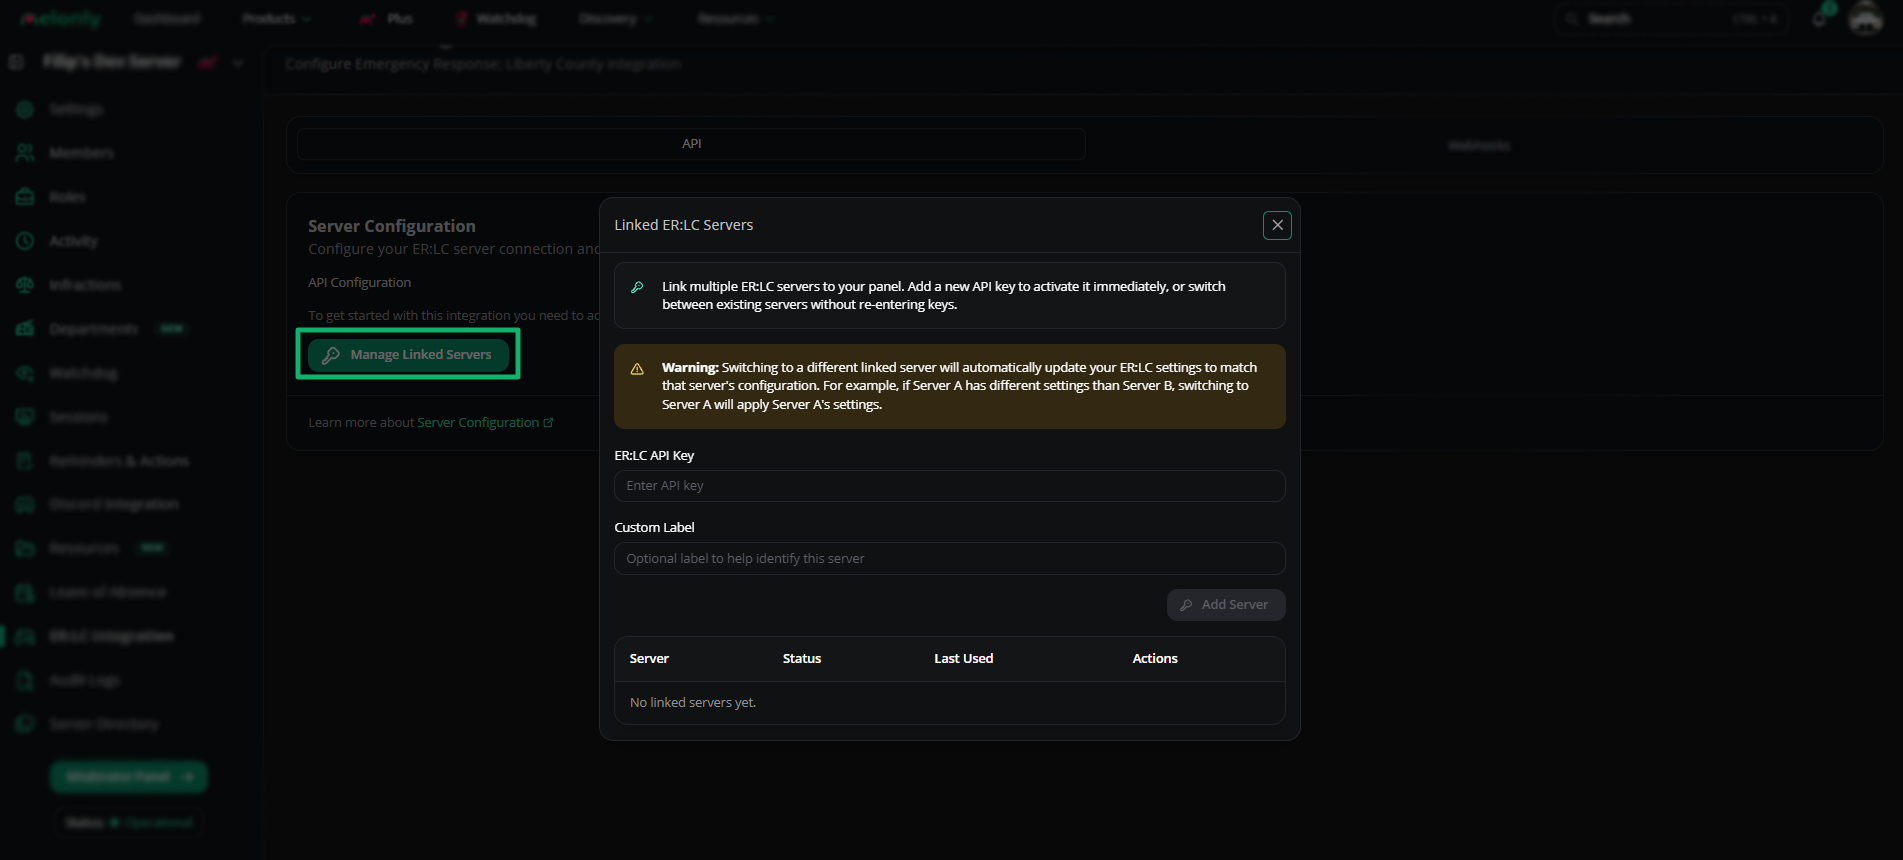
Example of setting your API key within the Melonly Dashboard
- ER:LC API
- Webhook
Here’s a breakdown of the powerful in-game integration features Melonly offers—designed to elevate your ER:LC private server experience. Many of these features are fully customizable, allowing you to tailor them to your server’s specific needs and moderation style. Whether you’re looking for enhanced control, automated checks, or real-time data at your fingertips, we’ve got you covered.
Configure automatic shift management for staff members.
Server Configuration
API Configuration
API Configuration
Configure your ER:LC server connection and view server information.
| Server Configuration | Description |
|---|---|
| API Configuration | Able to set up API key by inserting the API Key in the “Set up/Update Key”. |
Server Information
Server Information
You will be able see your basic server information here, also you will be able to run rmeote commands by pressing the button called “Run Commands” and join directly to the server by pressing “Join Server”.
| Basic Information | Description |
|---|---|
| Server Name | This is the server name of the server. |
| Player | This is the amount of players in game during a time of viewing it. It may take up to 5 minutes for it to give the updated amount. |
| Join Code | This is the join code for the ER:LC Server, instead of using this you can press the “Join Server” Button. |
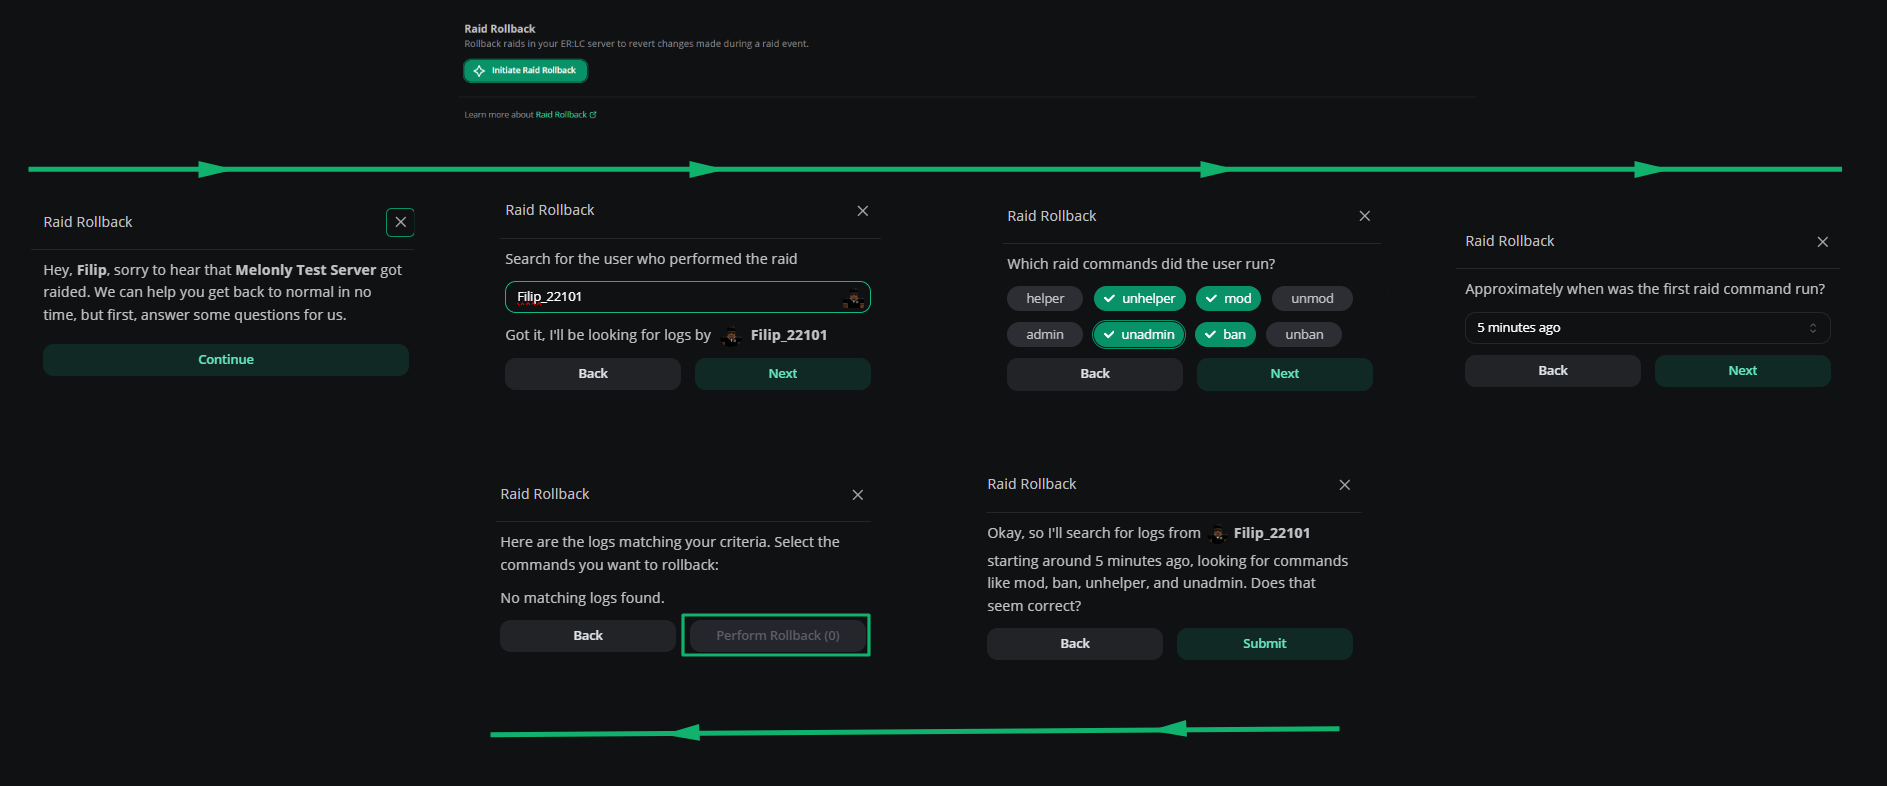
Raid Rollback
Raid Rollback
Raid Rollback
Raid Rollback allows you to revert any actions done in a raid. Answer some crucial questions, sit back and let us do the work.
Event Logs
Event Logs
Event Logs
Configure where ER:LC event logs are sent in your Discord server
This feature requires you to have Melonly Plus. You can learn more about that here.
| Event Logs Configuration | Description |
|---|---|
| Join Logs Channel | This is where ER:LC join logs will be sent. |
| Leave Logs Channel | This is where ER:LC Leave Logs will be sent. |
| Kill Logs Channel | This is where ER:LC Kill Logs will be sent. |
| Mod Call Logs Channel | This is where ER:LC Mod Call Logs will be sent. |
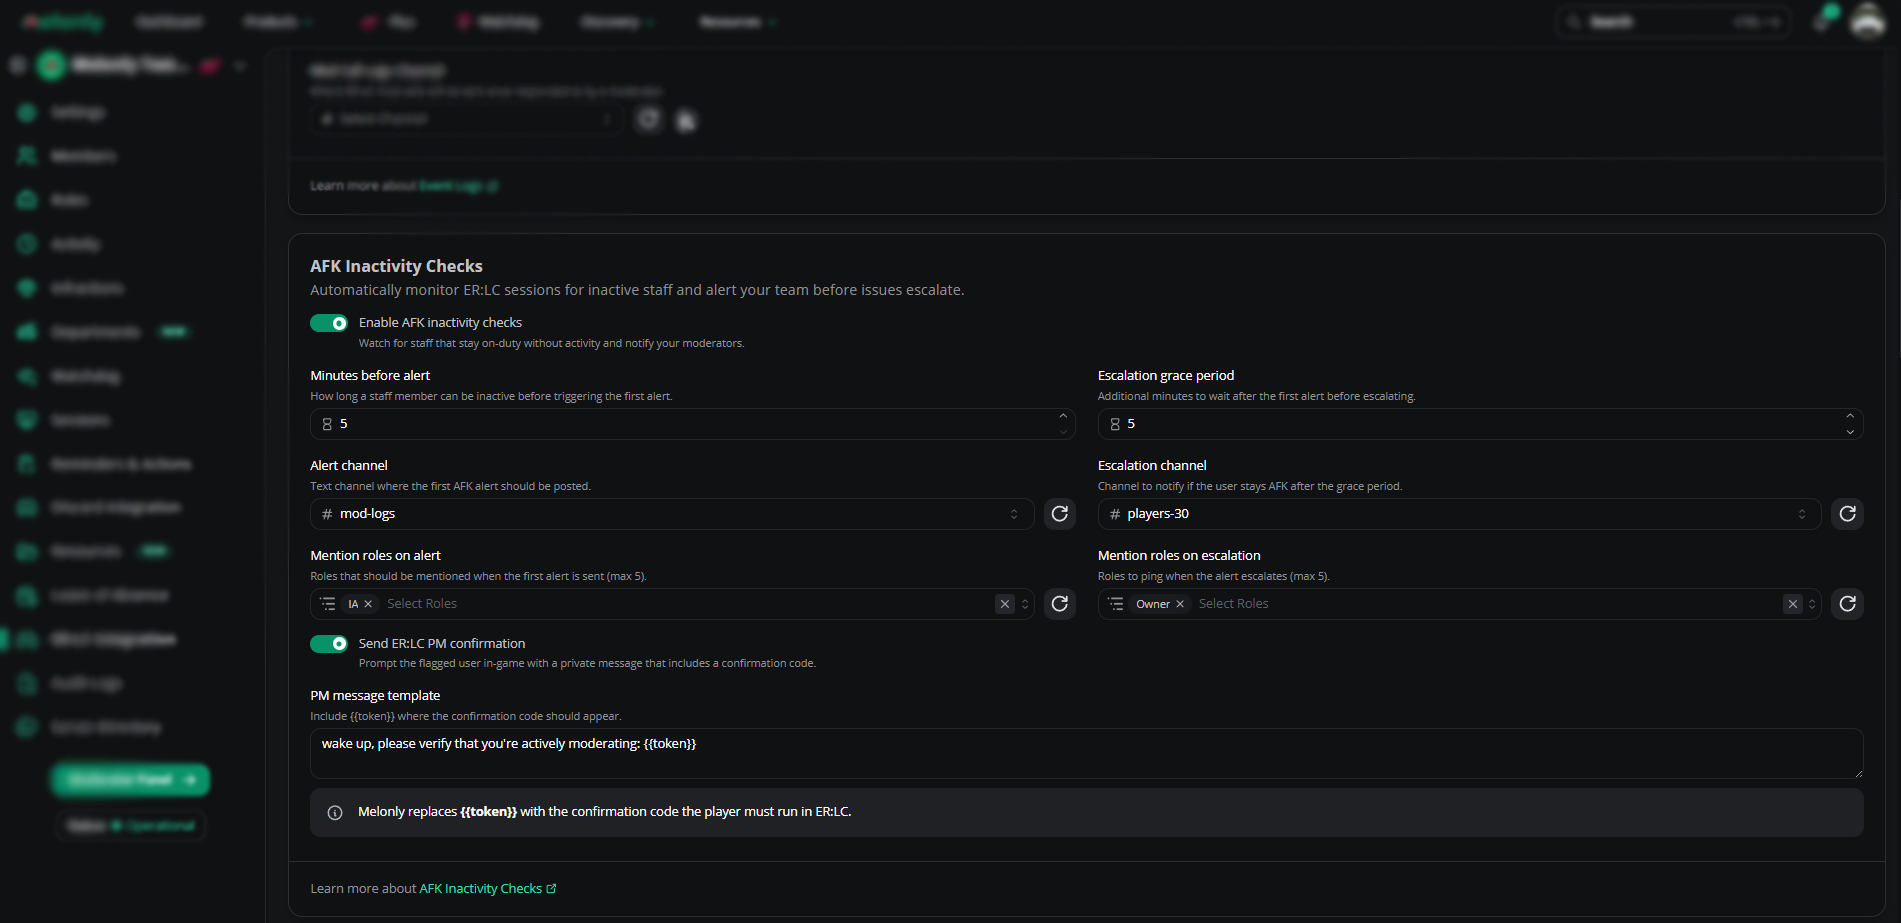
AFK Inactivity Checks
Inactivity Checks
Inactivity Checks
Inactivity Checks ensure that your staff members are actively moderating your ER:LC Private Server—Your staff will be required to repeat a code in command form sent via a private message (:PM), within your set duration to complete the check.
| Inactivity Checks Configurations | Description |
|---|---|
| Minutes Before Alert | Duration before the First Alert is Triggered |
| Alert Channel | The channel where the First Alert will be sent |
| Mention Roles on Alert | Roles Mentioned for the First Alert |
| Escalation Grace Period | Duration to be completed before Escalating |
| Escalation Channel | The channel where the Escalation Alert will be sent |
| Mention Roles on Escalation | Roles Mentioned on the Escalation Alert |
| Send ER:LC PM Confirmation | The message sent which contains the Confirmation Code |
| Confirmation Command | This is the command that must be ran within ER:LC to complete the check (:log code) |
Restrictions
Team Restrictions
Team Restrictions
You can restrict users from joining a team using this feature behind a Discord role. For example, if you don’t want certain members to be part of the Sheriff Team unless they have a certain role, you can set it so they are unable to join that team.
Vehicle Restrictions
Vehicle Restrictions
You can restrict access to vehicles behind a Discord Role, meaning that if the user does not hold the correct role, they will not be able to use said vehicle without it alerting staff members in the Panel or optionally through reminders.
VC Server Status
VC Server Status
VC Server Status
Voice channels that automatically update with server information.
This feature requires you to have Melonly Plus. You can learn more about that here.
| Voice Channel Types | Description |
|---|---|
| Playercount VC Channel | The voice channel will display the amount of players which are in-game. |
| Queue VC Channel | The voice channel will display the amount of players which are in queue. |
Ban BOLO
Ban Bolo
Ban Bolo
Configure automatic ban BOLO completion settings
| Toggleable Features | Description |
|---|---|
| Manual Completion | Will allow staff with the ERLC Admin permission and Ban permission to automatically ban players when they approve Ban BOLOs. |
| Automatic Completion | If a player with a Ban BOLO joins the server, Melonly will automatically ban them. |
Shift Automation
Shift Automation
Shift Automation
This feature requires you to have Melonly Plus. You can learn more about that here.
| Toggleable Features | Description |
|---|---|
| Automatic Shift Start | Automatically start a staff member’s shift when they join the ER:LC server. Requires Roblox account linking. |
| Automatic Shift End | Automatically end a staff member’s shift when they leave the ER:LC server. Requires Roblox account linking. |
Punishment Controls
Punishment Controls
Punishment Controls
Configure automatic punishment and rejoin settings
This feature requires you to have Melonly Plus. You can learn more about that here.
| Features | Description |
|---|---|
| Punishment Rejoin Timer | If a user is kicked, duration they be kicked for before melonly kicks/bans them again automatically. |
| Kick or Ban | Toggle between Punishment Rejoin Timer being a kick or ban. |
Welcome Messages
Welcome Messages
Welcome Messages
Configure welcome message settings for new players
| Welcome | Description |
|---|---|
| Welcome Message | This is the welcome message which will be posted to a new player when they join, the new joining member only will be able to see this. |
Permission Management
Permission Management
Permission Management
Configure welcome message settings for new players
This feature requires you to have Melonly Plus. You can learn more about that here.
| Permission Management | Description |
|---|---|
| Automatic Permission Removal | Melonly will automatically remove someones permissions in-game when they leave the linked Melonly server. |
Username Moderation
Username Moderation
Username Moderation
Configure automatic username moderation
| Username Moderation | Description |
|---|---|
| Kick “All/Others” Usernames | Should Melonly automatically kick anyone with usernames starting with all/others. |
Weather & Time
Weather & Time Sync
Weather & Time Sync
Sync the in-game time and weather with a real life city
This feature requires you to have Melonly Plus. You can learn more about that here.
| ER:LC Regional | Description |
|---|---|
| City Name | This will sync to the City, insert your City Name and 2 toggle switches will pop up. |
| Sync Weather | Sync in-game weather with the selected city. |
| Sync Time | Sync in-game weather with the selected city. |
In-game weather cycle must be disabled in your ER:LC server settings for this to work properly. |
To find out more about the
Kick Threshold feature please go to the Reminders & Actions Page! Melonly Support
Still need help? Join our Discord server and ask for help in the support channel. Our staff team will be happy to assist you with any issues you may have.